We all know how frustrating it is to print something from your computer but your printer won’t cooperate.
Most printer owners have experienced this problem, printer not printing black ink, before. And some even experienced this issue as soon as they put new inks in their printer that makes it more frustrating.
Today, we’re going to tell you how to fix your printer that is not printing black ink and how you can prevent this issue from happening again.
To start things off, let’s discuss why printer not printing black ink occurs in the first place.
Common Causes Of Printer Not Printing Black Ink
Your printer not printing in black can be caused by a handful of different factors. Some of these factors are:
Empty Ink Cartridge/s
This one’s pretty straightforward.
If your printer has an empty black ink cartridge, then you won’t be able to print any black and white documents.
Unfortunately for printer owners that have 4 or more ink cartridges inside, it gets a lot worse.
A printer that uses 4 different cartridges, such as black, cyan, magenta, and yellow, will need to have enough ink on all cartridges to print black and white documents. That means for you to avoid or fix your printer not printing in black problem, you should have sufficient ink levels in all of your four ink slots.
To know more about this one, go to our FAQ section at the end of this guide.
Printhead Issue
Your printer’s printhead is the most important and expensive part of your machine. If your printhead is damaged or dirty, then your printer won’t function properly. And may cause ink system failure or ink not being recognized by your printer.
There are two ways you can fix or clean your printhead: automatically by utilizing your printer screen or manually by removing your printhead from your printer and cleaning it on your own.
Just a reminder, not all printers have removable printheads. Some printheads are fixed in their position, so your only choice will be to do it automatically.
This is not as bad as it seems, since we strongly advised against cleaning your printhead manually as doing this may cause more damage.
There’s a good reason why manufacturers chose to automate printhead cleaning on their printers. The printhead is a very sensitive part of your printer and can be easily damaged if mishandled. If you have a damaged printhead, then you won’t be able to use your printer at all.
Incompatible Paper
This one does not happen a lot, but it’s still a cause of concern. The paper you’re using to print documents should be compatible with your printer as this affect your printouts’ quality.
Using incompatible paper may damage your printhead making it unable to print certain types of color. Incompatible papers are the ones that are too thick for your printer.
Some may also have a glossy surface that your printer may not be able to penetrate with its inks.
Expired Ink Cartridges
Yes. You read that right. Ink cartridges much like edible items have an expiration date. The typical expiration of an ink cartridge is 2 years after it was manufactured.
Once your ink cartridge expires, your printer may not be able to read it properly causing you to experience print quality issues.
It’s better if you check the box before purchasing to make sure you won’t be buying expired ink cartridges. This is for you not to waste your money and time.
Printer Driver Problem
Your printer not printing in black ink is not only caused by your printer hardware but also your printer software. The printer driver you’ve installed on your computer may have been corrupted making your printer unable to print certain colors properly.
Your printer driver should always be up-to-date and running so your computer can send the proper information to your printer.
The printer driver acts as a bridge between your printer and computer. If this bridge is broken, then you may encounter some printing problems like printer offline, not being able to print in color, or black ink.
Basic Printer Checkup
If you have a multi-function printer, then you should do these steps first before performing any troubleshooting steps.
To get started with our basic printer checkup, you should turn on your printer. Make sure your printer screen is working fine, with no display issue or button problem.
Put a document on your scanner glass. Any type of document will do. Now, on your printer screen select the copy button.
If you were able to copy a document successfully, then you can proceed to the basic troubleshooting steps below.
If you were unable to copy, then you have a much bigger problem than just your printer not printing in black ink.
Basic Troubleshooting For Printer Won’t Print Black
Step 1: Check your ink levels
The first step in fixing your printer not printing in black problem is to check your ink levels. You can do this step in two different ways.
Go in front of your printer screen and click on the icon that looks like a teardrop. Most printers available today have this icon on top or at the bottom of their printer display screen.
Check Ink Levels Icon or the Teardrop Icon
Another way is by opening your printer software on your desktop screen, it usually has your printer icon and name. Once that program’s open, select the option that says “Check ink levels“.
The ink levels that you’re going to see here might not be that accurate to the actual ink levels inside your ink cartridges, but it still provides you with a good estimate of how much ink you have.
If it’s more than a quarter full, then you should be fine.
If it’s less than a quarter full, then you should change your ink cartridge to see if it can help fix your printer issue.
Step 2: Change your ink cartridges
Once you’ve identified the amount of ink on each of your cartridges, it’s now time to change those with low ink levels.
For those who haven’t change their printer inks before, follow these instructions.

Open your cartridge access door. Printers have different types of cartridge access doors. Have your printer manual ready so you’ll know where it is located. Some printers have it in front of the printer so you just have to pull the door to open it or lift the handle up.
You may also check your printer manual online on your printer’s manufacturer’s website if you don’t have it with you.

HP Printer Manual
Click here or the image to download HP Printer Manual

Canon Printer Manual
Click here or the image to download Canon Printer Manual

Epson Printer Manual
Click here or the image to download Epson Printer Manual
Once your ink cartridge access door is open, the ink cartridges should now go to the center of your printer automatically. The part of your printer that encloses your cartridges is called the printhead.
If the printhead doesn’t move to the center of your printer, then you have to close the door and do a hard reset first. To know more about hard resetting your printer, see the FAQ section at the end of this guide.
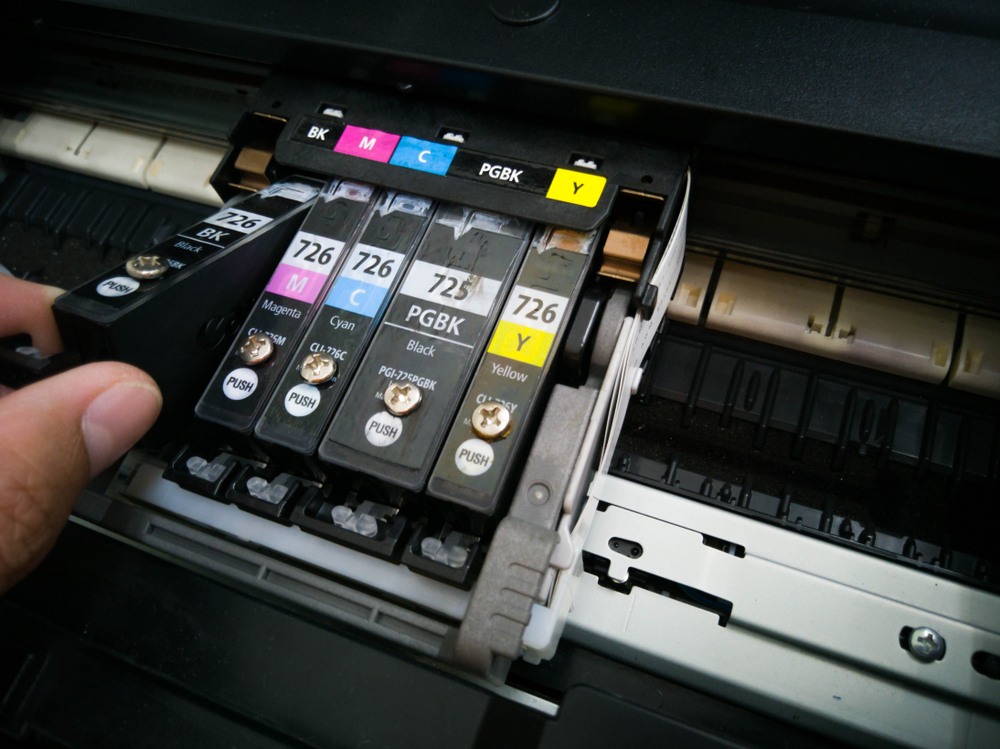
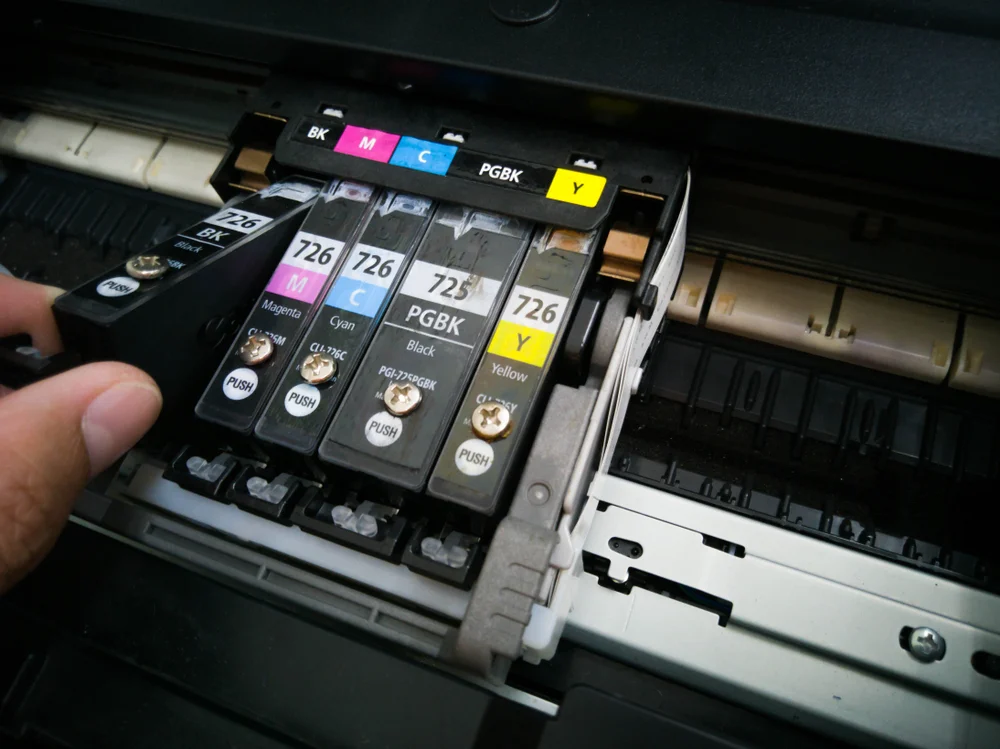
If you’re able to see all your printer inks inside your printer and you can easily reach them, then you may now remove the one with low ink levels.
It’s either you push the cartridge in first for you to pull it out or you have to gently pull the cartridge upwards.
Once removed, push the new ink cartridge inside the printer. The part that has bronze-colored contacts should go in first and should be facing downward. Your ink cartridge should snap into its place after putting it in your printhead.
Step 3: Clean your printhead
You can easily clean your printer’s printhead by using the options on your printer screen. First, select the gear icon or your Settings icon.
Gear icon or Settings icon
It will then give you a list of options, you have to locate the words “Tools” or “Printer Maintenance“, then click whichever you see first.
It will now show you another set of options, you have to select “Clean Printhead“.
Cleaning your printhead allows your printer to remove debris and flush old inks out of your ink cartridges. This process will print out a page. You should inspect if the page printed has the right colors and the quality is okay.
If not, perform another set of printhead cleaning. You can do this up to 5 times or until you’re satisfied with the printout.
If you’ve already exhausted all five tries and the printout is still not showing any black ink, then proceed to do advanced troubleshooting steps.
Advanced Troubleshooting For Print Quality Issue
Since we did all we can fixing the printer hardware during the basic troubleshooting steps, we’ll now solve the problem from a different angle.
We’re going to look into your printer software. We’ll continue to fix your printer issue by going in front of your computer or laptop screen and doing all the troubleshooting steps there.
Removing and Reinstalling Printer Driver
The first step we need to do is open your “Devices and Printers” window.
You can do this by clicking the Windows key on your keyboard and the letter “R” simultaneously. You can also click the windows icon on your taskbar and type in the word “Run“.
Once the Run application window is open, type in “control printers” then click the “OK” button.

It will open your “Devices and Printers” window. Look for your printer icon and name. Right-click it and select the option “Printer Preferences“.
This will show your printer settings and printer maintenance tab. You need to check if your printer driver is not corrupted, it should show you the options to print in black only or color.
If you don’t see that option, then your driver might be corrupted.
Exit the window, and right-click your printer icon again on the Devices and Printers window. Choose the option “Remove device“.
Go to your Control Panel home page by clicking the words control panel near the top of the window. Look for “Uninstall a program” under Programs and Features. Once there, find your printer driver’s name and uninstall it from your computer.
Printer Not Printing Team’s Reinstalling Tip
Here is our team’s way to make sure you have a clean slate before you reinstall your printer driver and no further file corruption will occur. This is what we refer to as doing a clean uninstall of your printer driver.
The first step for a clean uninstall is you have to stop your print spooler first. You can do these in two ways.
- Search for your command prompt using Windows’ search. Once you see the Command Prompt app, right-click it with your mouse and choose “Run as administrator“. This will give you access to make changes to your computer. It should open a new window, you just have to type in “net stop spooler” to stop your print spooler.
- Open your task manager, go to the services tab, and locate your print spooler. Right-click the print spooler name and select “stop” on the options that will show.

Go to your spool folder. You can do this by opening the Run application again and typing in the word “spool” on the text box. Click on the OK button, and it should open a new window afterward.

You’ll see a handful of folders there. First, you have to remove all temp files or temporary files stored by your printer on your computer.
Go to the “PRINTERS” folder and delete all the files there.

Next, go back to your spool folder and go to the “drivers” folder and choose the x64 folder. It will show another set of folders afterward, right-click the “3” folder and rename it to “3.old“.

After doing all those, go back to your task manager window and start your print spooler.
Just like stopping the print spooler, you have two ways to start the spooler again.
- Search for your command prompt using Windows’ search. Once you see the Command Prompt app, right-click it with your mouse and choose “Run as administrator“. This will give you access to make changes to your computer. It should open a new window, you just have to type in “net start spooler” to stop your print spooler.
- Open your task manager, go to the services tab, and locate your print spooler. Right-click the print spooler name and select “start” on the options that will show.

After you start the spooler, restart your computer and printer afterward.
Once ready, reinstall your printer driver by installing the newest version available on your printer manufacturer’s website.
After your printer driver setup installation, try printing a document and see if it will print in black.
If all the steps did not work, then feel free to contact us and we’ll look into your printer issue.
5 Tips To Avoid Printer Not Printing Black and White Pages
Use genuine inks
You should only use genuine ink cartridges on your printer. Those cheap inks you see being advertised that are said to be compatible with your printer system may cost you more than save you money in the long run. Your printer was not tested to use those types of inks, so its system may deteriorate if you’re going to use those regularly.
Your printer manufacturer can void your printer warranty if you’re found to be using non-genuine inks.
Use compatible paper
The paper you use in your printer is just as important as the inks. Some papers are too thick for your printer and could damage the printer rollers. If you plan on using specialty boards and papers, you should check that the paperweight is supported by your printer.
Paperweight is measured in gsm or gram per square meter. Most home printers can support papers with 60 to 200 gsm. For just simple document printing, we recommend using these HP Multi-Purpose papers.
Using thick paper may ruin the alignment of your printer that could cause more printer issues like a paper jam error.
Update your printer driver
As you may have already know your printer not printing in black can be caused by an out-of-date printer driver. Try checking for a printer driver update after you update your computer’s operating system. Printer manufacturers usually release a printer driver update a week or two after a Windows 10 major update or a macOS major update.
Perform printer maintenance
Now that you know how to do printer maintenance using your printer display screen or on your computer, you should do it at least once a month or whenever you change your ink cartridges. This helps in removing air and debris from your printhead that may cause print quality issues.
We also advise printer owners to use printer cleaning sheets to remove dirt and debris inside their printers faster.
Use your printer
You should use your printer at least once a week as this helps prevent inks from drying out. You don’t have to print multiple documents every week. A one-page document will do.
If you’re not going to use your printer for an extended period, then you should perform printer maintenance before using it. It also helps to have replacement ink cartridges ready to replace your inks whenever you experience print quality issues.
It may also be best for you to consider getting a printer dust cover to prevent dust from accumulating inside your machine.
Frequently Asked Questions For Printer Not Printing Black Ink
How to hard reset my printer?
If you’re having some printer issues, then hard resetting your printer may help you fix your printer.
To hard reset a printer, you have to unplug the power cord in your printer to turn it off. You don’t have to press the power button to turn it off. Just unplug and leave it that way for at least two minutes.
Afterward, connect the power cord back to your printer and make sure that your printer is connected directly to a wall outlet and not a power extender.
Press the power button to turn your printer on and see if everything’s fixed.
Those are the steps to hard reset your printer successfully.
Why can’t I print in black?
If you’re a printer owner that uses four ink cartridges in their printer, then you might be wondering why you’re unable to print in black despite having enough black ink in your printer.
This usually happens, when one of your colored ink cartridges (cyan, magenta, and yellow) has a low ink level or is already empty.
The printer technology used today allows your printer to use all the colors on your printer to produce more vivid colors. The default settings on your printer driver are “color“. This means even if you’re just printing black and white documents, your printer automatically utilizes all the colors.
Having an empty colored ink cartridge may cause your printer to not print black ink since your printer utilizes all your ink colors when printing the black color on your documents.
You may try changing your printer preferences to print in grayscale or black and white only for your printer not to utilize colored ink cartridges when printing.
What are the reasons why my printer is not printing black ink?
The reason why your printer cannot print in black may not be because of your printer at all. Several factors can stop your printer from printing black ink.
It can be caused by your ink cartridges. Empty black ink cartridges will definitely stop your printer from printing any black ink. Also, empty color cartridges may prevent your printer from printing black ink, since some printer utilizes all colors to print a more vivid black color.
Having a good amount of ink on all colors is recommended to prolong your printer’s life and avoid any print quality issues.
Another reason your printer is not printing black can be caused by debris or paper stuck on your printer. If there is some debris preventing your printer from printing black ink, then you should perform printer maintenance on your machine to clean it out.
You may also be using the wrong type of paper. If you’re using incompatible paper on your printer, it may prevent it from printing black too.
Last but not the least, your printer driver. Having an outdated printer driver can cause your printer to not print black ink. Your driver is how your printer and computer communicate with each other. If it’s a printer driver issue. then your best solution is to remove and reinstall your printer driver to get the up-to-date version.
Why is my printer printing in color but not black ink?
Your printer may be able to print in color but not black due to the following reasons.
First is you may have already run out of black ink. This will prevent your printer from printing black altogether.
Second, your printer’s printhead may be damaged or something is blocking the black ink from coming out of it. Perform printer maintenance on your machine to resolve the issue.
Lastly, the “printer can print color but not black” issue may be caused by an out-of-date printer driver. Remove and reinstall your printer driver to fix this printer issue.
Why is my printer printing blank pages?
A printer printing blank pages can be quite hard to solve. Good thing we’re able to compile a list of reasons why printers print blank pages, so we can fix this issue easily.
Empty ink cartridges
Check your ink levels each time you print. If you have an ink cartridge already low on ink, you should replace it right away. Ink levels showing on your printer screen may not be that accurate. Your printer may already have empty ink cartridges even if it’s showing a 10% level when you checked it.
Dirty printhead
Your printer’s printhead is the most important and expensive part of your printer. You have to make sure it’s properly maintained. A dirty printhead may cause your printer to print blank pages.
Incompatible printer driver
Make sure that you’re using the right printer driver on your computer. An incompatible or outdated printer driver can cause your printer to print blank pages. Remove and reinstall your printer driver if this is the cause of your printer problem.
Network issue
An invalid wireless connection may also cause your printer from printing blank pages. Check if your printer and computer are connected to the same WiFi network. Also, make sure your connection is private. You don’t want other people to waste your paper by accessing your printer through a public network.
If your printer has been printing blank pages without you commanding it to do so, then you should disconnect your wireless printer connection immediately.
After disconnecting from your printer from your Wifi, make sure that you’re only using a private network and not a public one.
Remove and reinstall your printer driver from your computer. Do a hard reset of your printer by unplugging it from your power source for at least 2 minutes without pressing the power button to turn it off.
Once ready, connect your printer back to your WiFi or internet connection. Your printer should stop printing any blank pages after reconnecting.
hi Josh, I have a Hp photosmart printer 6510. It will not copy or print in black ink. I have performed clean ink head at least 5x, and cleaned cartridge. . Replaced hp black and color ink. I have reset printer several times.I have done printer driver up date. Please help I have spent $80 ink .
Hey Jan. The HP Photosmart printer you have has already been phased out for quite some time now. If you’ve already spent $80 on new inks, it might be best to consider getting a new printer. New printers have cheaper inks compared to older models. Since you have a Photosmart there, you may be better suited to getting the HP Envy printers, they’re the upgraded version of your old printer.
Hi Josh
I have a Canon Pixma 4840 printer.
It just stopped printing black (PGBK) – Text as well as photos
I’ve rinsed the ink head.
I have also replaced the ink head.
I’ve already updated the drivers.
I’ve done a hard reset.
Still no luck
Do you perhaps a solution for me please.
Thanks
Hey Reza,
Have you tried doing a semi-full reset of your Canon printer? This will push it back to its factory settings. You can refer to your printer manual about it.
Hey! I just got a new HP Officejet but it is not working and I could not reach HP support. How can I print black and white documents on this? It’s printing colored docs but not black.
If this is a new HP printer and you haven’t been able to print black and white documents, then you should remove and reinstall the printer software on your computer. If that still does not fix your HP printer, you can try using brand new HP ink cartridges.
Pingback: How To Fix Ink Cartridges Not Recognized Error | Printer Not Printing
Pingback: Printer Covers Buying Guide: Best Printer Dust Covers This 2021 | Printer Not Printing
This actually fixed my HP printer not printing in black! Wasn’t sure it would work. Thanks
Glad this guide on how to fix printers not printing in black helped! Cheers
Pingback: How To Fix Printer Not Printing Colors Correctly | Printer Not Printing